Acrylic Pouring is a great thing: Even if you are not gifted with a brush, you can bring great creations to a canvas with Pouring. In this article I would like to introduce a technique from the Pouring series: Open Cup
With the Open Cup technique, the acrylic paint is mixed in the same way as with almost all pouring techniques.
Prepare the paint
You mix the pouring medium and the acrylic paint in equal parts.
Mixing colours correctly
- Mix acrylic paint and pouring agent 1:1
Time to mix
- At least one minute per colour
Water addition
- Adjust by feel - The mixture must not become too liquid.
With the addition of water the so-called viscosity of the mix is adjusted. In clear words: you use the water to ensure that the mixture of paint and pouring medium is not too tough. To get it right, you need a little practice. Basically, it may already be so liquid that it drips from a wooden stick. But be careful: With too much water you destroy the pigments and the picture does not “work” properly.
Why silione oil?
Silicone oil is not generally required. The oil ensures that the colours remain “separated”, i.e. that they do not mix later during the pouring process or do not mix everywhere. This then enables the picture to develop the so-called cells after the pouring. You can see an example of cells here in the photo.
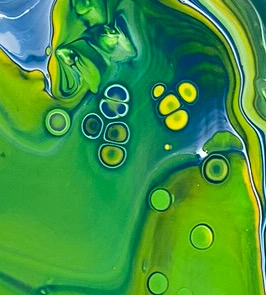
Cells after addition of silicone oil
Typically, only a few drops of silicone oil are added. On a cup with 0,1 liters (3.4 oz) colour mixture I usually give only one drop. It is also not necessary to add silicone oil to every colour.
##What about the Open Cup?
At the Open Cup, as already mentioned, the colours are mixed normally as any with acrylic pouring arts.
Priming
Then the canvas is primed with an equally prepared mixture of acrylic paint and pouring medium - so you make sure that there is really a layer of this paint everywhere. This can be white, like in my demo video, but it can also be any other basic color.
Preparation
The canvas is primed more or less evenly with a pouring agent and white acrylic paint (1:1).
Take care not to have any bubbles in it. These can be removed with a spatula if necessary.
A protected drip tray or cardboard box is mandatory ;-)
Fit the stretcher frame with pinboard pins on the back.
The ‘open’ cup
Next, a cut open paper cup is placed on the primed canvas.
Tip: If you don’t get it cut straight, simply turn this cup over and let the side that is cut crookedly point upwards.
We then put the individual colours in small quantities into this cup in layers. When decanting, please be very careful that the colours mix as little as possible. The fact that a little paint also escapes from the bottom open cup is quite normal and does not disturb further.
When we have all the paint in the open cup together, we drive it very carefully over the canvas until there is no more paint in the Open Cup. Most of the time you create a part of the canvas with it, that’s ok. You then take the cup off the canvas and, as with most pouring techniques, you can simply move the canvas a little bit, tilt it a little bit to spread the colors on the canvas. If paint drips over the edge, no problem, it must be like this 😉
Finish
If you are satisfied with the distribution, you can still warm the paint slightly with a hot air blower, a hair dryer or a flambe torch. This is a matter of drawing the small air bubbles and some moisture out of the paint. At the same time this activates the silicone oil and the desired cells appear. Not too hot, not too hot and not too much wind in the case of electrical appliances …
I hope the description helped you. You can find all details in the video of the Open Cup Pouring.