
We are approaching the 80th video on our YouTube channel “verkunstet”. In the meantime our set and our selection of cameras and lighting has settled down a bit. Of course there can always be changes, but in the last weeks it has already stabilized. Reason enough to take a closer look at how we work, and a few days ago we had a request from a viewer to find out how we work. I’m happy to take this as an opportunity to write this blog article.
For a better understanding first of all an overview of our recording room, which we will call “studio”:
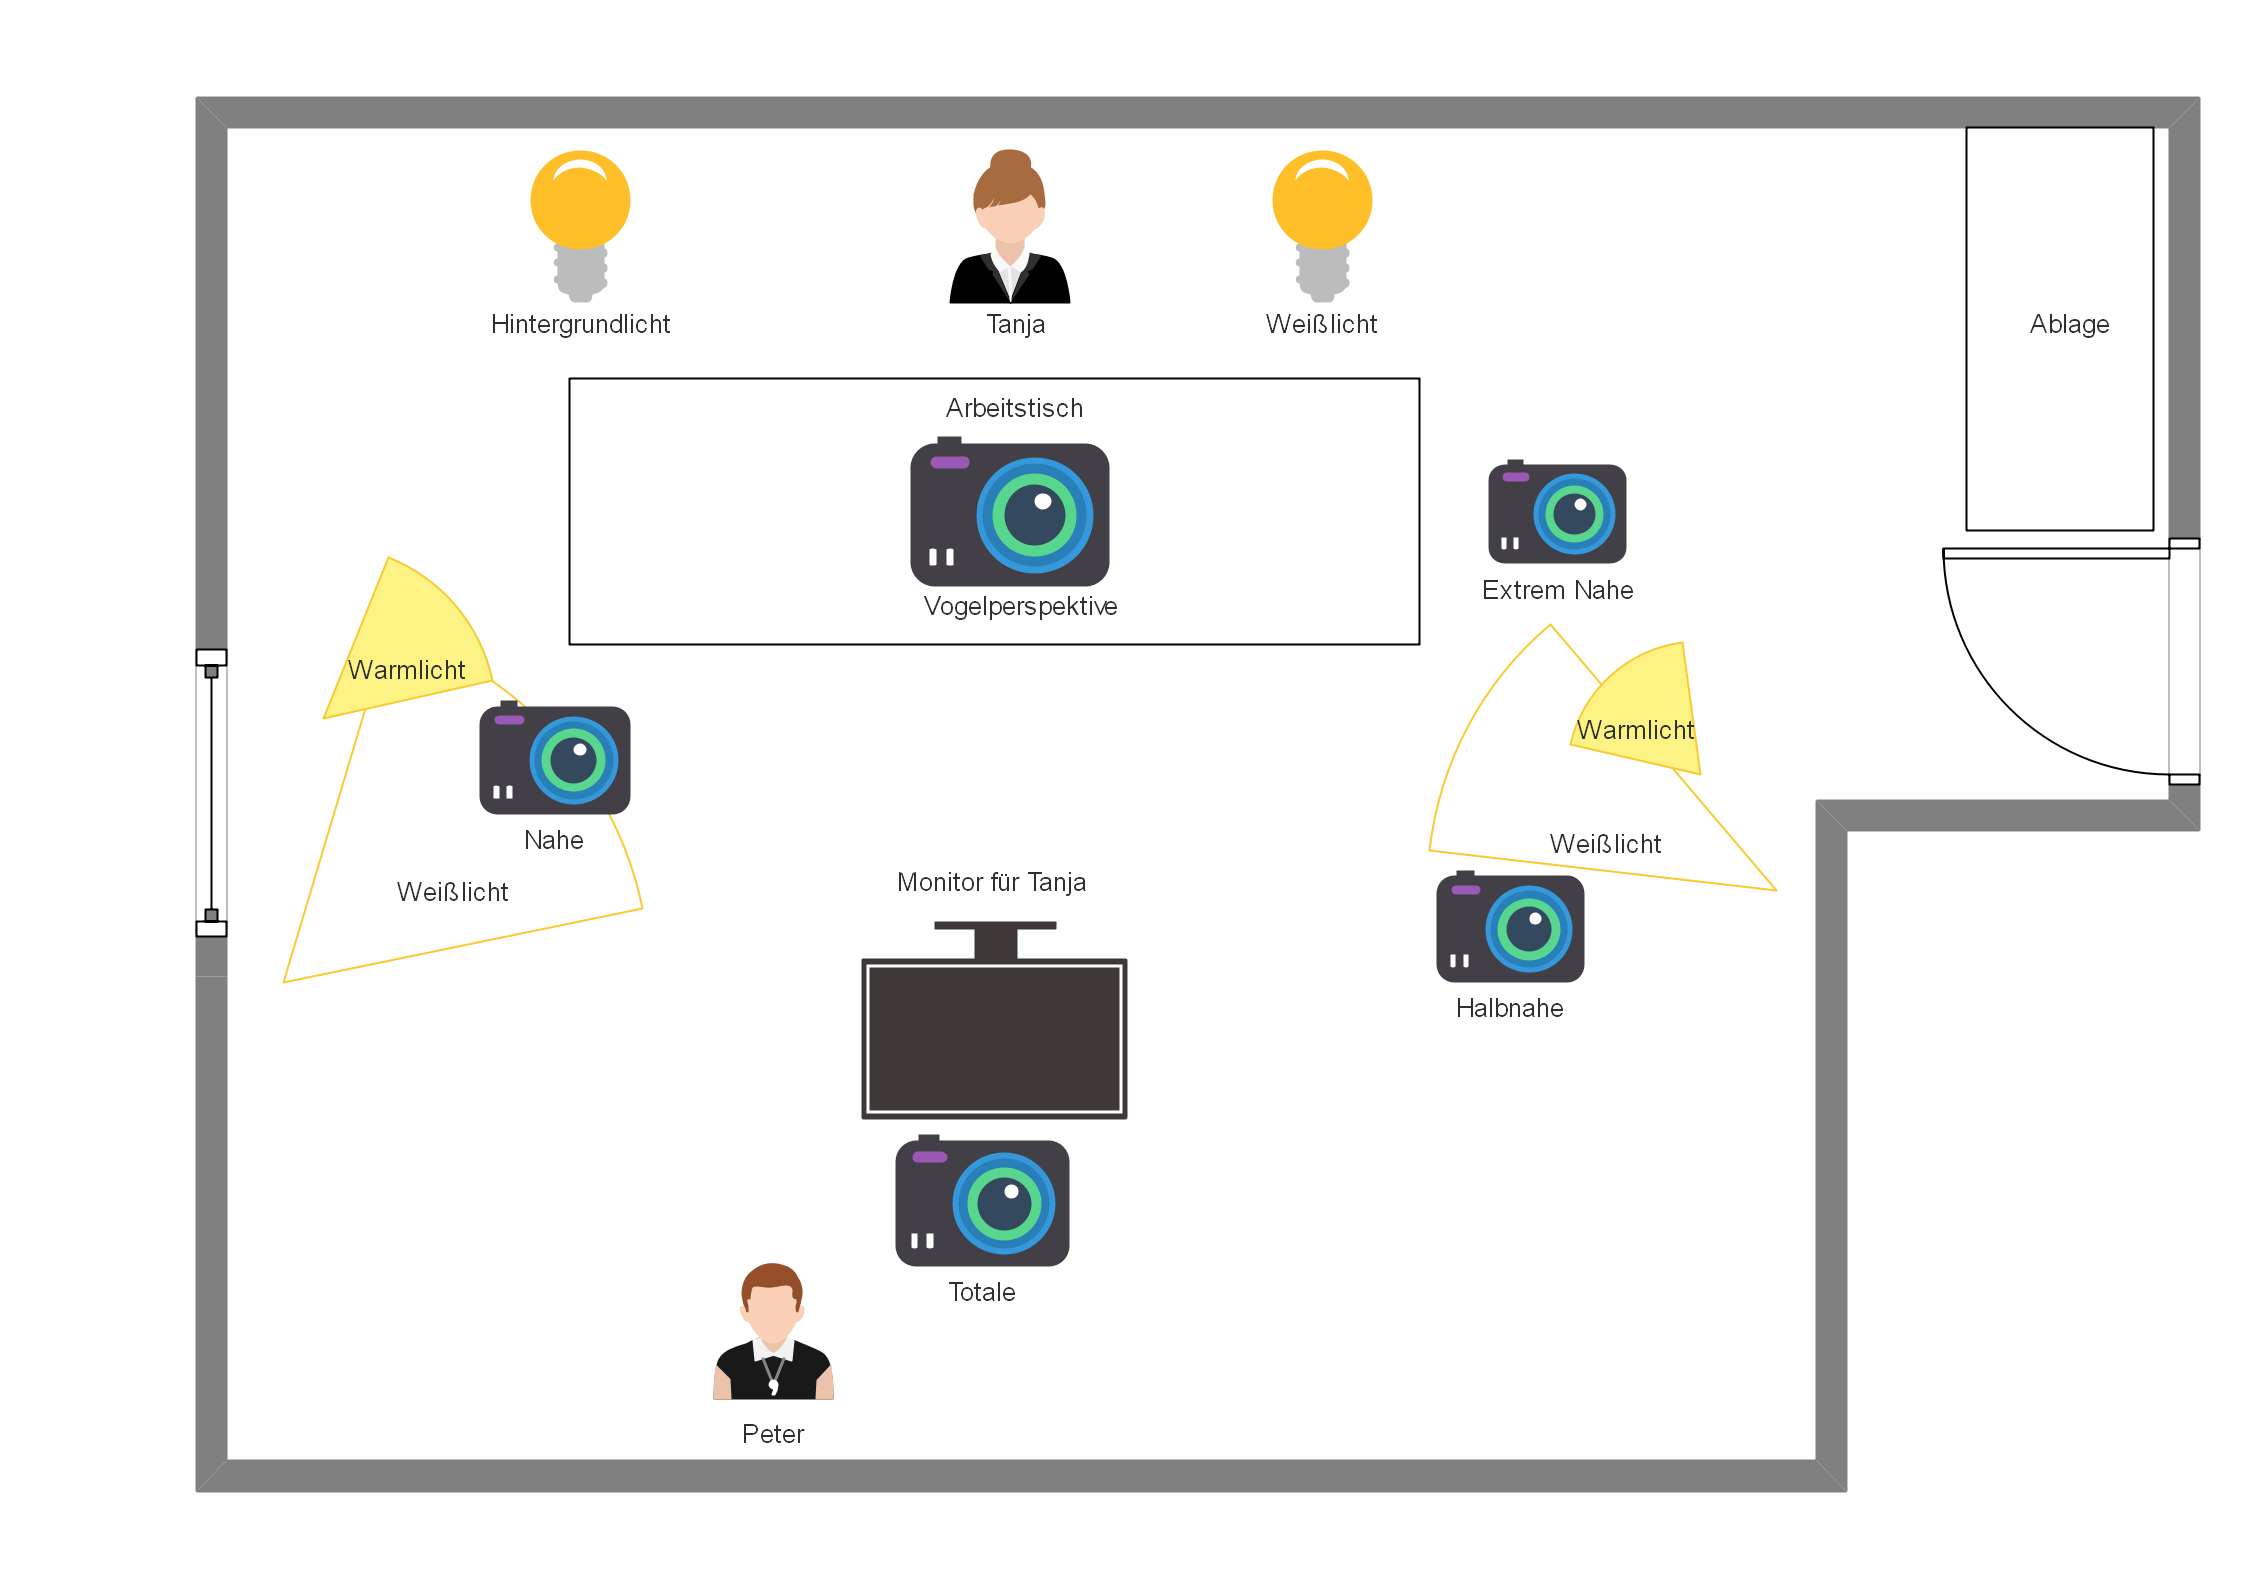
Our studio floor plan
If you have seen some of our videos from 2019 on, you know that they are almost exclusively shot in our studio. Unfortunately the room is a bit small and therefore quite crowded. We usually work with four cameras, rarely with five. When it gets really “awesome”, the cameraman - me - also takes his smartphone out of his pocket and takes single snapshots or short sequences with it, so it can be for a few seconds that there is a sixth camera in the game. But that is really the exception.
Lighting
We have a total of three lamps in softboxes from Walimex for the basic brightness. Two of them stand on their tripod, the third one is on the floor behind Tanja’s desk. We want to replace these in the long run by a normal neon tube lamp with white LED tubes, but when time comes, there will be a new lamp 😉
We bought the white basic lighting on Amazon a long time ago and have been using it from the beginning. In the overview plan above the three Walimex Daylights are called “white light”, because they bring a lot of white light into the set. Due to the softbox this happens without much shadow throwing.

In addition, we have bought two Neewer 660 LED headlights, which have the advantage of being adjustable in brightness and colour tone. This means that you can make a little more or less light as needed, depending on how much natural light comes through the window. Furthermore you can also counteract the hard white tone of the two front Walimex Daylight. The Neewer 660 have the charming advantage that they are portable and can also be used with rechargeable batteries besides the power supply unit. So if you need light somewhere else, it’s easy and without cable tangle. At some point we bought softbox covers for the Neewer 660, which simply create less shadow in the studio. For outdoors they swallow too much light, but outdoors it’s all about lightening and shadows are not the issue. The Neewer 660 with softboxes can be found in the following box.
We also have a small 12 Watt LED spotlight from Craphy hanging above the work surface. This is actually intended for use on a camera, but it also does its job on the tripod boom right next to the top camera.


Camera setup
We use a Nikon CoolPix L820 for the total and the medium-long shot or medium close-up camera position. This camera type is a little older, but it does its job. These cameras belong to the category of easy to use system cameras. Photos can be taken unspectacularly but it is very user-friendly.

Long shot camera position with control screen (back) for Tanja
In fact, the CoolPix L820 can record 30 minutes of video in HD at a time - as long as there is enough memory available on the SD card. The full shot is in a normal view position, i.e. slightly higher than the centre of the picture. The camera on the right also has normal view when the picture is half full, and a view when the picture is half close. It is also very practical that the cameras are available in different colours. So we have one in black and one in violet.
Tip: The Nikon CoolPix L820 is end of sale quite a while. But you can get pretty good used devices on ebay.de (ebay Advertisement) or Amazon.com ( Advertisement)
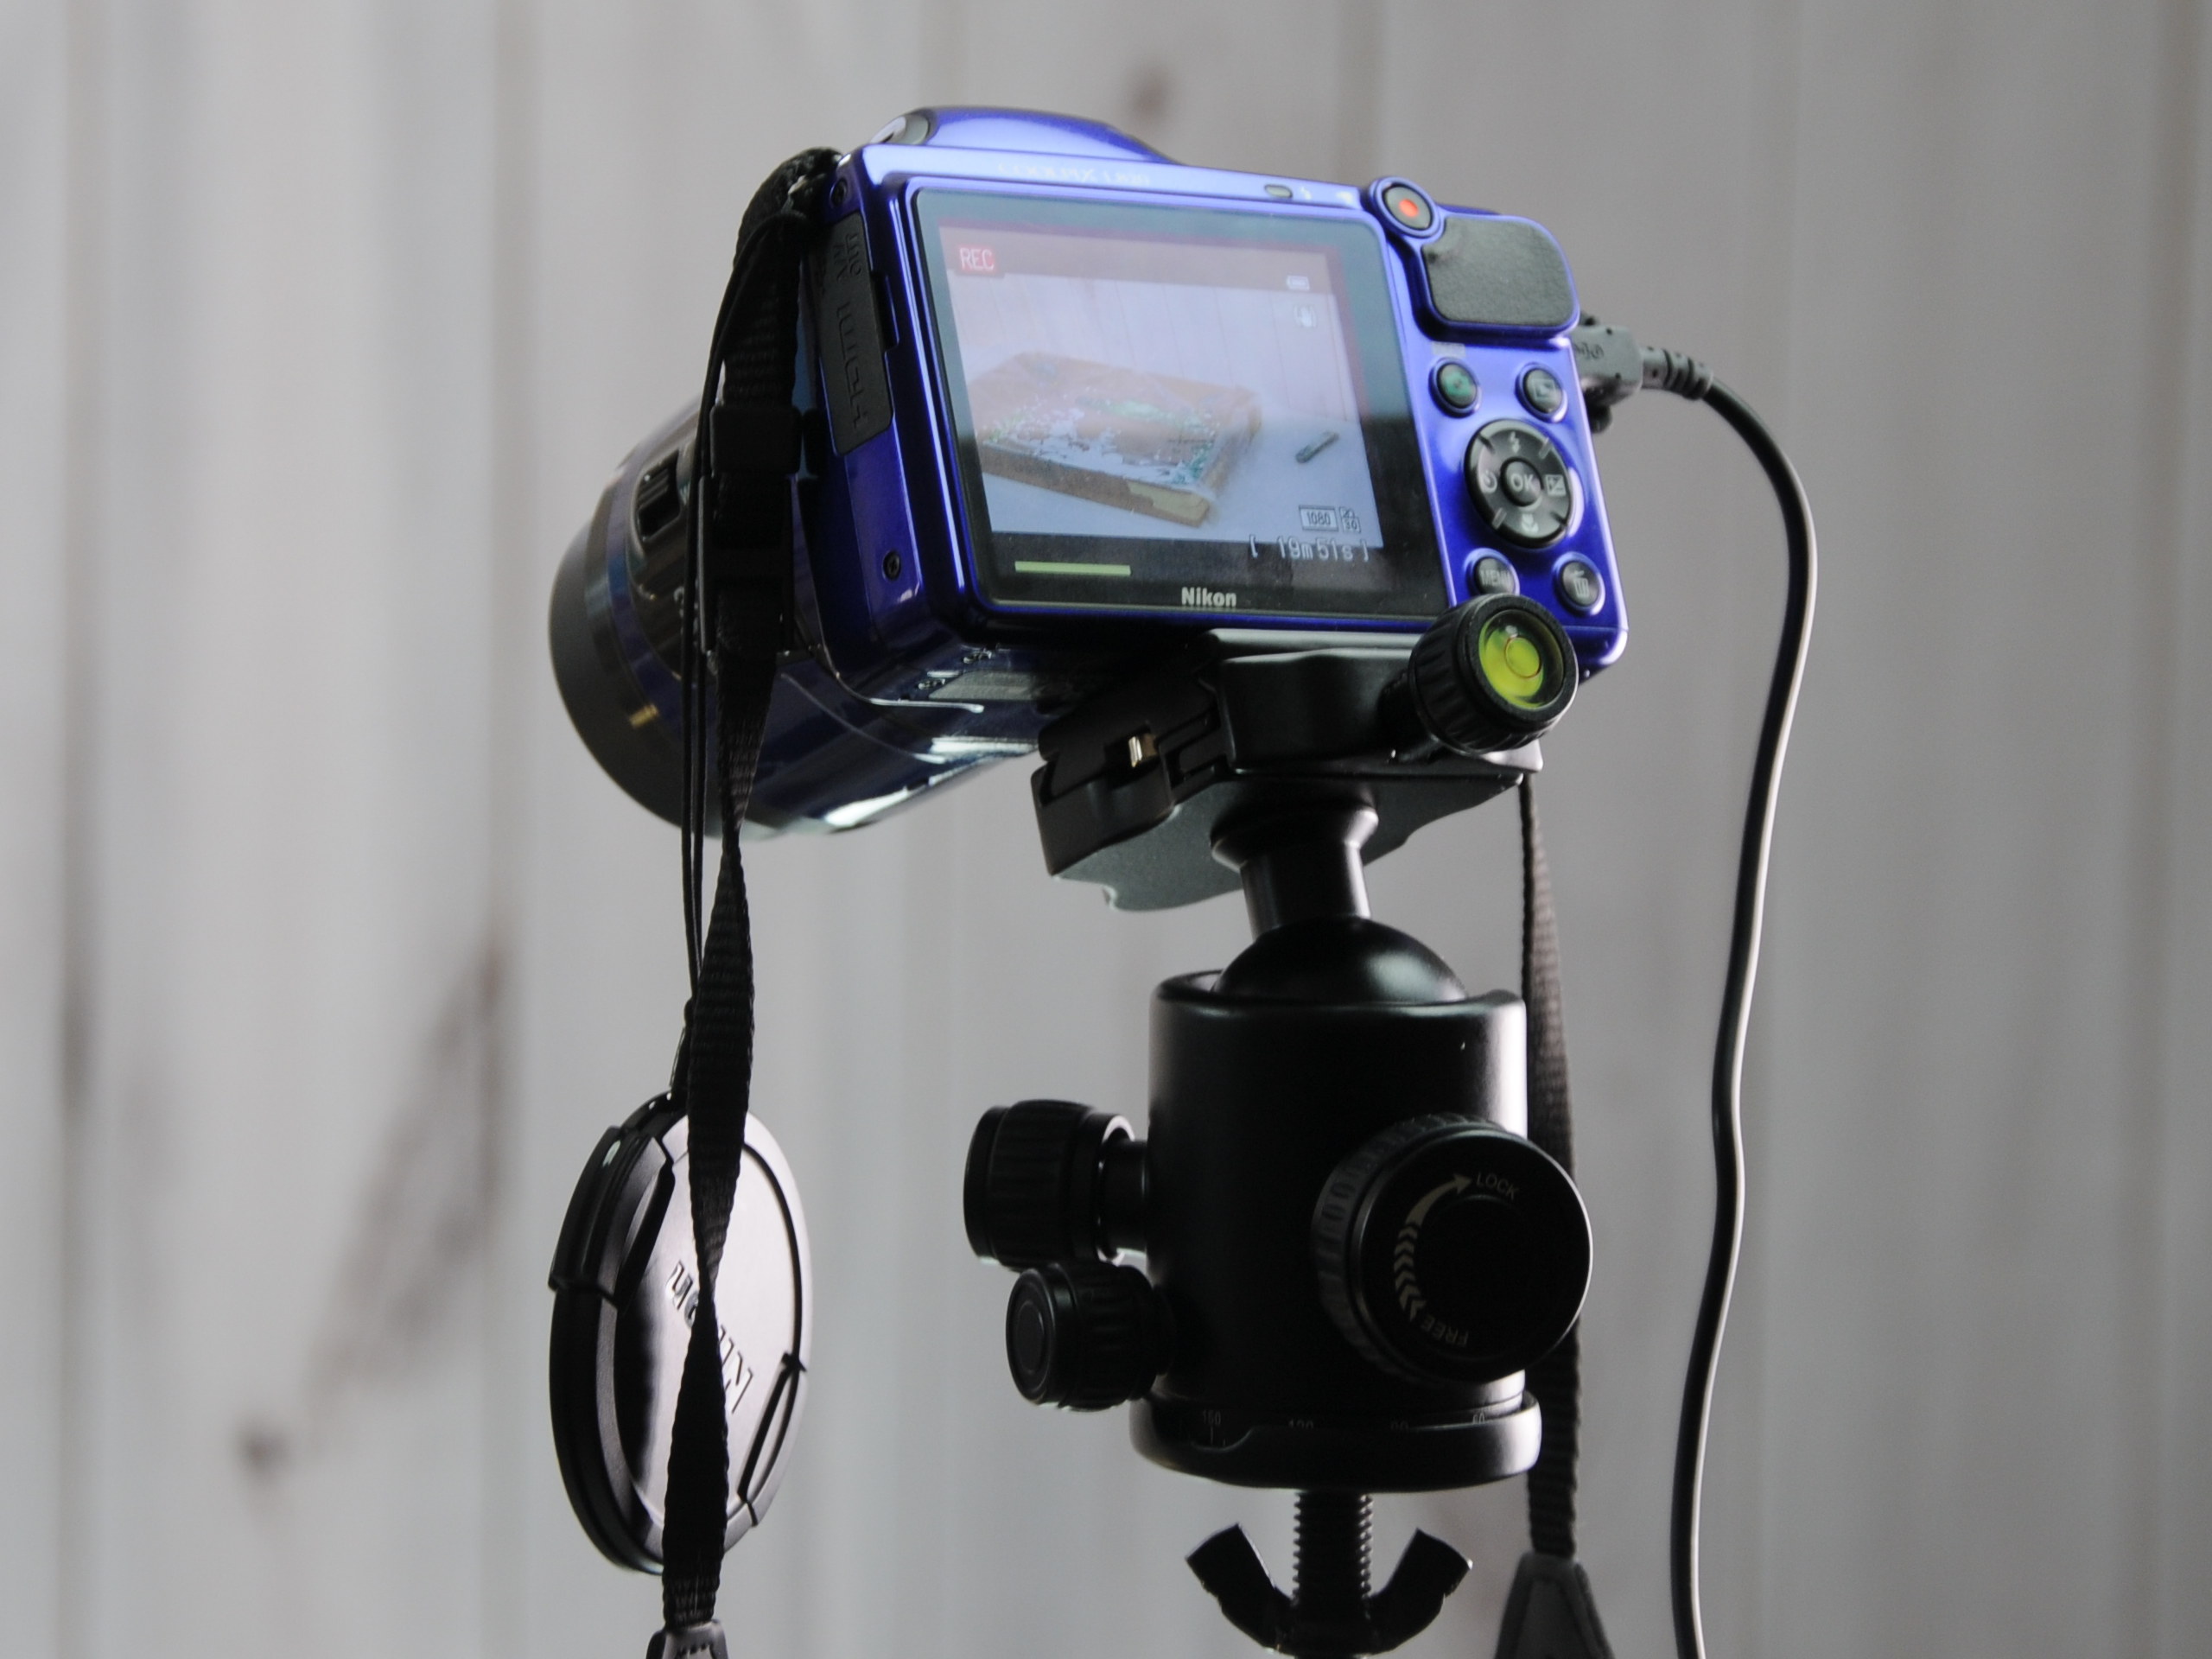
Medium shot setting with Nikon CoolPix L820
If you are a little bit interested in which parts of the picture we mean: a definition medium or long shot etc. could be found on Wikipedia.
While the two Nikon CoolPix L820s sit on static tripods that are practically never adjusted, we still have a Nikon D5600 for close-ups. The Nikon D5600 is a digital single lens reflex camera (DSLR). I use it with the supplied standard lens DX-18-140VR. The close-up camera sits on a Tarion tripod, which is set higher and thus always offers a view. The Tarion TRP-FH01 offers a soft and above all smooth movement in tilt and rotation.
Nikon D5600 on Tarion video tripod - In the background you see the boom arm for a bird's eye shot
The last fixed camera position we have is a Sony camcorder hanging over Tanja’s table in bird’s eye shot position. For this we have a camera boom next to the table, which holds the camera and the Craphy LED spotlight described above in position.
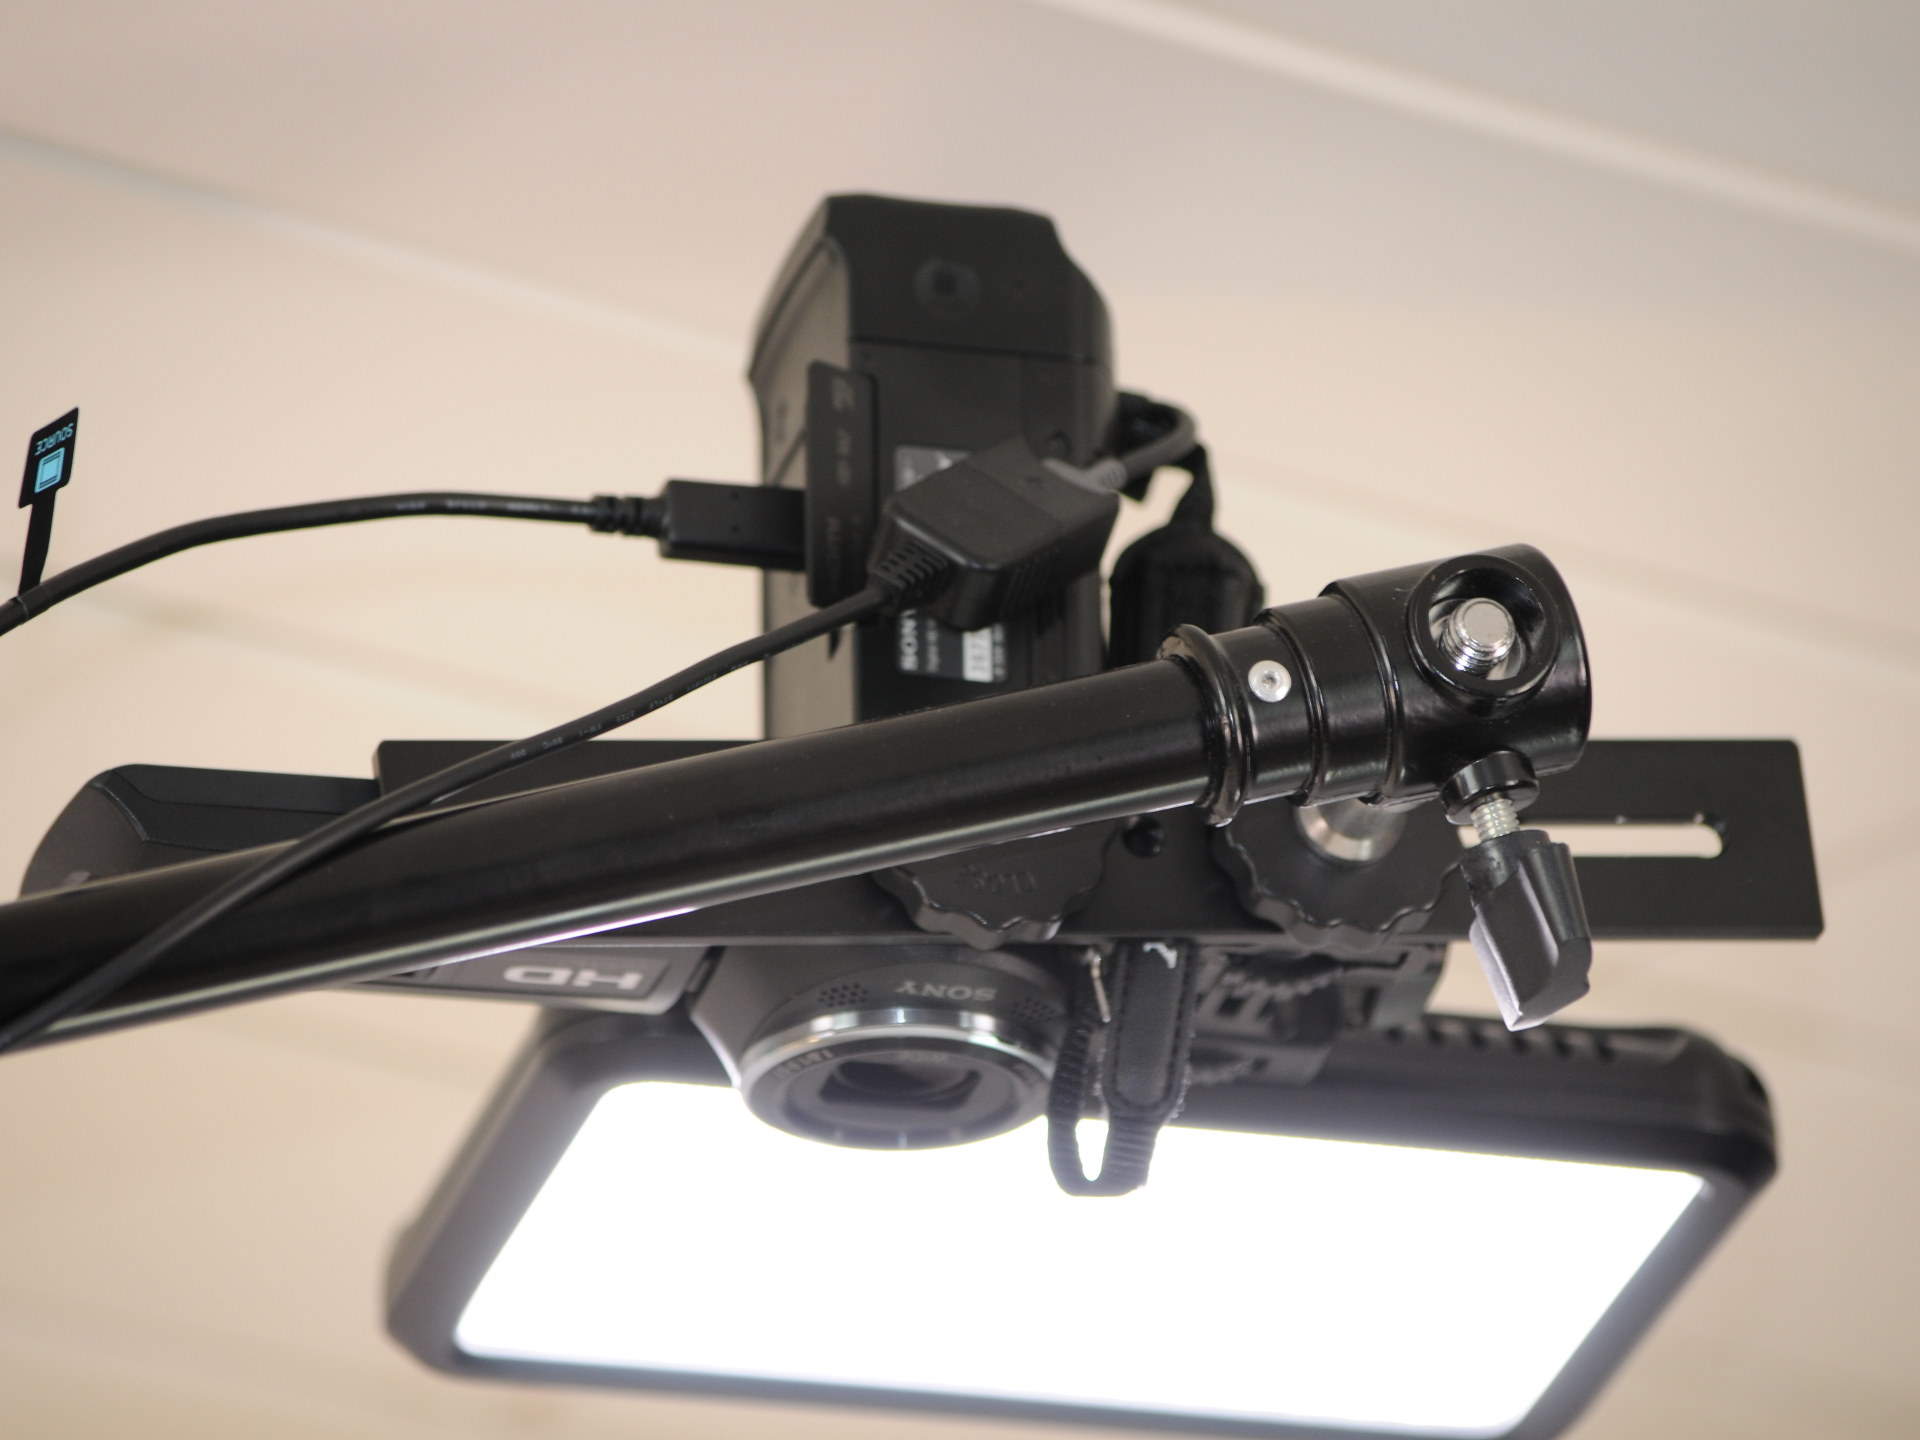
Sony Camcorder with Craphy Mini headlight
The Sony camcorder is not particularly good at recording, but it has two unbeatable advantages over cameras:
- motion compensation: The boom arm sometimes swings a little, which the camcorder can easily compensate for.
- autofocus
- practically infinite recording time. We start the camcorder at the beginning of a video and let it run through.
Since the recording quality can be improved, I’ve been thinking for a while about recording the output HDMI signal via laptop. The HDMI picture is much better than the rather broken compressed files that the Sony camcorder produces.
For super close-ups or manual “overflights” we use a GoPro Hero7 black if necessary. On the one or other video you can even see it in the picture with a small gorilla tripod. Before we had the second L820, we also used the GoPro as a semi-full shot. You can find our camera types on Amazon here in this block:


The Nikon CoolPix L820 hasn’t been produced for a while.
Our studio background is a printed fabric, which is stapled to a pole attached to the wall. In this way we can also hang a green background or a black background for special shots without the need for much effort. It is also possible to change the motif if necessary, which we have not yet done.
Control monitor
Tanja can see a screen from her position that shows the current picture from the camera close by. In the long run, a second monitor is to be added, where you can see the bird’s eye view.
These control monitors are important to keep Tanja in the picture. We are currently solving the problem with the missing monitor by choosing a rather large picture section. Of course it would be nicer if the camcorder used a little more zoom and thus more details could be seen.
The monitor is a normal ACER PC monitor with HDMI input. We have a second one of these, which I can see as a cameraman. The two monitors are connected with an HDMI splitter. This is necessary because the Nikon D5600 unfortunately switches off the built-in screen as soon as an HDMI cable is plugged in.
Sound engineering
We made it easy with audio 😉 All cameras have built-in microphones, only on the Nikon D5600 we have connected a Rode smartLav+ lavalier microphone, which ensures a clean sound. We only need the other audio tracks to synchronize the video recordings. In fact, the camera sound recordings with the built-in microphones are rather poor. Only the Sony camcorder produces halfway good sound, but is also the closest to Tanja.

Software
We use Vegas Pro 17 ( Advertisement) to cut and edit our videos, which may seem a bit excessive, but it has advantages when you work with many cameras at the same time. Adobe Premiere would probably be just as good, if not better, but I started with Vegas when it was still distributed by Sony and I’ve stuck with it.
Accessories
Of course, we still have a lot of small stuff as accessories procured. Thus, all Nikon cameras have permanent power supplies so that we do not, as it happened to us in the beginning, suddenly have an empty battery in between. You can find all accessories in our list in our Amazon Storefront (advertising link)
Conclusion
We make a little effort, no question. Do we have to? No, probably not. I know of some YouTubers who can get by on their own with a camera or a smartphone. Editing programs are nice-to-have, as is light.
If I can recommend something that’s best to invest in, it’s good sound quality. Nothing is more annoying than a sound that is too quiet, unclear or has too much noise. We have had to learn a lesson there too. In the beginning we had a directed Rode - riding a microphone on the camera, which brought quite good sound, but only worked on Sundays in our apartment. On the other days the street noise was just too loud. Outside it did not work at all, despite the fur cap.
Write me in the comments if you liked the article. Maybe I’ll write an article about the other tools we use to manage the whole thing.
Greetings from Germany.
Peter